If you’re an avid YouTube user, you may have encountered the frustrating “YouTube Audio Renderer Error” message on your Windows computer. This error occurs when the audio renderer, responsible for playing audio in your browser, encounters a problem and fails to function properly. As a result, you’re left without any sound while trying to enjoy your favorite videos.
But fear not! In this article, we will guide you through the process of fixing the YouTube Audio Renderer Error on Windows. We will provide you with a comprehensive set of solutions and troubleshooting steps to help you get your audio back up and running in no time.
From updating audio drivers and clearing browser cache to adjust sound settings and disabling conflicting extensions, we will cover a range of methods to resolve this pesky error. We will also delve into checking for Windows updates, verifying internet connection stability, and even trying alternative browsers to ensure compatibility.
Our goal is to provide you with clear, concise, and easy-to-follow instructions to fix the YouTube Audio Renderer Error on your Windows computer. So, let’s dive in and get your audio working again so you can enjoy uninterrupted YouTube videos.
Before we begin, it’s important to note that the solutions provided in this article are specifically tailored for Windows users. If you’re using a different operating system, the troubleshooting steps may vary slightly. Now, without further ado, let’s get started on resolving the YouTube Audio Renderer Error on your Windows device.
What is the YouTube Audio Renderer Error?
All Heading
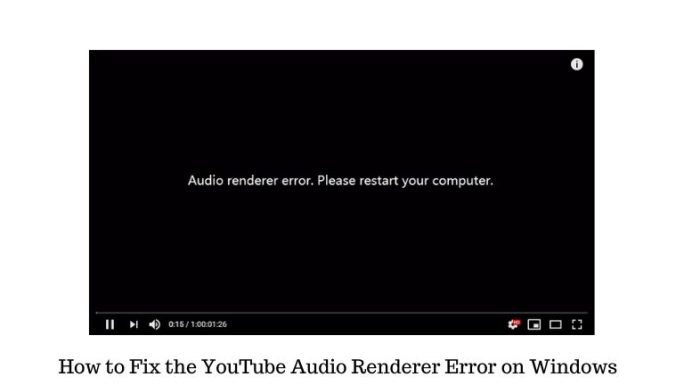
The YouTube Audio Renderer Error is an error message that appears when there’s an issue with the audio playback on YouTube videos. It typically displays the message, “Please restart your computer.” This error prevents users from hearing the audio while watching videos on YouTube, disrupting their overall viewing experience.
Common Causes of the YouTube Audio Renderer Error Please Restart Your Computer
Before diving into the solutions, it’s important to understand the common causes behind the YouTube Audio Renderer Error. By identifying the root cause, you can apply the most appropriate fix and prevent the error from recurring. Some of the common causes include:
- Outdated or incompatible audio drivers.
- Corrupted browser cache or temporary files.
- Interference from browser extensions or add-ons.
- Incompatible audio configurations or sound settings.
- Network connectivity issues or interrupted internet connection.
- Corrupted system files or software conflicts.
How to Fix the YouTube Audio Renderer Error on Windows
Here’s how to fix the error:
Restart Your Computer: The First Step to Fix the Error
When faced with the YouTube Audio Renderer Error, the first and simplest step you should take is to restart your computer. It may seem like a basic solution, but it often resolves temporary glitches or software conflicts that can cause the error. Restarting your computer refreshes the system and clears any temporary files or processes that might be interfering with YouTube’s audio rendering. So, give it a try and see if the error disappears after the restart.
Updating Audio Drivers: Ensuring Compatibility
Outdated or incompatible audio drivers can often be the culprit behind the YouTube Audio Renderer Error. These drivers are responsible for translating digital signals into audio output, and if they are outdated or incompatible, it can lead to audio rendering issues on YouTube. To update your audio drivers:
- Open the Start menu and type “Device Manager” in the search bar.
- Click on the “Device Manager” app from the search results.
- In the Device Manager window, expand the “Sound, video, and game controllers” category.
- Right-click on your audio device and select “Update driver.”
- Choose the option to search automatically for updated driver software.
- Follow the on-screen instructions to complete the driver update process.
Updating your audio drivers ensures compatibility with the latest software updates and can help resolve any conflicts causing the YouTube Audio Renderer Error.
Clearing Browser Cache: Resolving Temporary Glitches
Browser cache and temporary files can accumulate over time and cause various issues, including the YouTube Audio Renderer Error. Clearing the cache helps in removing any corrupt or outdated data, which may be interfering with YouTube’s audio rendering. To clear the cache:
- Open your browser and click on the menu icon (usually three dots or lines) in the top right corner.
- Select “Settings” from the dropdown menu.
- Scroll down and click on “Privacy & Security” or similar options.
- Look for the “Clear browsing data” or “Clear cache” option and click on it.
- Choose the appropriate time range (e.g., “All time”) and select the cache or temporary files option.
- Click on the “Clear data” or “Clear” button to delete the cache.
Once the cache is cleared, restart your browser and check if the YouTube Audio Renderer Error is resolved.
Disabling Browser Extensions: Eliminating Interference
Browser extensions and add-ons can enhance your browsing experience, but they can also interfere with certain website functionalities, including YouTube’s audio rendering. Disabling extensions temporarily can help identify if any of them are causing the error. Here’s how you can disable extensions in popular browsers:
- Google Chrome:
- Click on the menu icon in the top right corner and select “More tools.”
- Choose “Extensions” from the expanded menu.
- Toggle off the switch next to each extension to disable them temporarily.
- Restart Chrome and check if the error persists.
- Mozilla Firefox:
- Click on the menu icon (three lines) in the top right corner and select “Add-ons.“
- In the Add-ons Manager tab, click on “Extensions” in the left sidebar.
- Click the toggle button next to each extension to disable them temporarily.
- Restart Firefox and check if the error is resolved.
- Microsoft Edge:
- Click on the menu icon (three dots) in the top right corner and select “Extensions.”
- Toggle off the switch next to each extension to disable them temporarily.
- Restart Edge and check if the error disappears.
Disable the extensions one by one, restarting your browser each time, to identify the one causing the YouTube Audio Renderer Error.
Checking for Windows Updates: Patching Known Issues
Windows updates often include bug fixes and improvements that can resolve known issues, including the YouTube Audio Renderer Error. To check for updates:
- Open the Start menu and click on the gear icon to open the “Settings” app.
- In the Settings window, select “Update & Security.”
- Click on the “Windows Update” tab in the left sidebar.
- Click on the “Check for updates” button to search for available updates.
- If any updates are found, click on the “Install” button to proceed.
- Follow the on-screen instructions and allow your computer to restart, if required.
Installing the latest Windows updates ensures that your system is equipped with the latest fixes and patches, which may resolve the YouTube Audio Renderer Error.
Adjusting Sound Settings: Optimizing Your Audio Configuration
Sometimes, incorrect sound settings can lead to audio rendering issues on YouTube. Adjusting the sound settings can help optimize your audio configuration and potentially resolve the error. Here’s how you can do it:
- Right-click on the speaker icon in the system tray and select “Open Sound settings.”
- In the Sound settings window, scroll down to the “Advanced sound options” section and click on “App volume and device preferences.“
- Check if the correct output device is selected for both the browser and system sounds.
- Adjust the volume levels and ensure that none of the sliders are muted.
- Close the Sound settings window and play a YouTube video to check if the error persists.
Optimizing your sound settings can ensure that the audio output is correctly directed to your preferred device and may help resolve the YouTube Audio Renderer Error.
Using an Alternative Browser: Testing Compatibility
If the YouTube Audio Renderer Error persists even after trying the previous steps, it’s worth testing YouTube on a different browser to check for compatibility issues. Sometimes, certain browser versions or configurations may conflict with YouTube’s audio rendering. Install an alternative browser such as Mozilla Firefox or Microsoft Edge and try playing YouTube videos there. If the error doesn’t occur in the alternative browser, it suggests that the issue may be specific to your primary browser.
Temporarily Disabling Firewall and Antivirus Software: Ensuring Uninterrupted Connection
Firewalls and antivirus software play a crucial role in protecting your system, but they can sometimes interfere with network connections, causing audio rendering issues on YouTube. Temporarily disabling these security measures can help identify if they are the cause of the error. Here’s how you can disable the firewall and antivirus software:
- Disabling Firewall
- Windows Firewall
- Open the Start menu and search for “Windows Security.“
- Click on “Windows Security” from the search results to open the app.
- In the Windows Security app, click on “Firewall & network protection.”
- Click on the currently active network profile (e.g., “Domain network” or “Private network“).
- Toggle off the switch next to “Windows Defender Firewall.”
- Play a YouTube video to check if the error is resolved.
- Third-Party Firewalls: Refer to the documentation or support resources for your specific firewall software to learn how to temporarily disable it.
- Windows Firewall
- Disabling Antivirus Software: The process to disable antivirus software may vary depending on the product you are using. Generally, you can find the option to disable or pause protection in the antivirus software’s settings or system tray icon. Refer to the software’s documentation or support resources for detailed instructions.
Disabling firewall and antivirus software temporarily should only be done for troubleshooting purposes and with caution. Once you have identified whether they are causing the error, remember to re-enable them to ensure ongoing system protection.
Verifying Internet Connection: Ensuring Stable Connectivity
A stable and uninterrupted internet connection is essential for smooth playback of YouTube videos. Network connectivity issues can lead to the YouTube Audio Renderer Error. To verify your internet connection:
- Check if other websites and online services are functioning properly. If not, it suggests an internet connectivity problem.
- Restart your router and modem by unplugging them from the power source, waiting for a few seconds, and then plugging them back in.
- Connect your computer to the router using an Ethernet cable, if possible, to rule out any Wi-Fi-related issues.
- Contact your internet service provider (ISP) to inquire about any known network outages or issues in your area.
Ensuring a stable internet connection can help prevent interruptions while streaming YouTube videos and potentially resolve the audio rendering error.
Resetting TCP/IP Stack: Fixing Network Configuration Issues
Resetting the TCP/IP stack can help fix network configuration issues that may be causing the YouTube Audio Renderer Error. Here’s how you can reset the TCP/IP stack:
- Open the Start menu and type “Command Prompt” in the search bar.
- Right-click on “Command Prompt” from the search results and select “Run as administrator.”
- In the Command Prompt window, type the following commands one by one, pressing Enter after each command:
netsh winsock reset
netsh int ip reset
ipconfig /release
ipconfig /renew - Once the commands are executed, close the Command Prompt window and restart your computer.
Resetting the TCP/IP stack can refresh your network configurations and potentially resolve the YouTube Audio Renderer Error.
Running a System File Checker Scan: Fixing Corrupted System Files
Corrupted system files can also lead to the YouTube Audio Renderer Error. Running a System File Checker (SFC) scan can help identify and repair any corrupted files. Here’s how you can run an SFC scan:
- Open the Start menu and type “Command Prompt” in the search bar.
- Right-click on “Command Prompt” from the search results and select “Run as administrator.“
- In the Command Prompt window, type the command
sfc /scannowand press Enter. - The scan will start, and it may take some time to complete.
- Once the scan finishes, restart your computer and check if the error persists.
The System File Checker scan examines your system files for any corruption and attempts to repair them, potentially resolving the YouTube Audio Renderer Error.
Disabling Hardware Acceleration: Preventing Rendering Issues
Hardware acceleration allows your computer’s graphics card to assist in rendering videos, improving performance. However, in some cases, it can cause conflicts with YouTube’s audio rendering. Disabling hardware acceleration can help resolve such conflicts. Here’s how you can disable hardware acceleration:
- Open your browser and click on the menu icon (usually three dots or lines) in the top right corner.
- Select “Settings” from the dropdown menu.
- Scroll down and click on “Advanced” or similar options.
- Under the “System” section, toggle off the switch next to “Use hardware acceleration when available.”
- Restart your browser and check if the YouTube Audio Renderer Error is resolved.
Disabling hardware acceleration removes the graphics card’s involvement in video rendering, which can help prevent conflicts and potential errors.
Conclusion
The YouTube Audio Renderer Error can be frustrating, but with the troubleshooting steps outlined in this article, you can resolve the issue and enjoy uninterrupted audio playback on YouTube. Remember to restart your computer as the first step, update your audio drivers, clear your browser cache, and disable any interfering browser extensions.
Additionally, adjusting sound settings, checking for Windows updates, and ensuring a stable internet connection can also help resolve the error. If the problem persists, consider running a system file checker scan, resetting the TCP/IP stack, or disabling hardware acceleration.
By following these steps, you can troubleshoot the YouTube Audio Renderer Error effectively and get back to enjoying your favorite videos hassle-free.


Recent Comments