Welcome to this article where we will explore the wonderful world of custom URLs for your Blogger website. If you’re a blogger looking to personalize your blog’s web address and make it easier for your readers to remember, you’ve come to the right place! In this guide, we’ll break down everything you need to know about custom URLs in a simple and easy-to-understand manner. So, let’s dive right in!
What is a Custom URL in Blogger?
All Heading
A custom URL, also known as a custom domain or vanity URL, is a unique web address that you can choose for your blog. It replaces the default URL provided by the blogging platform, such as “yourblog.blogspot.com,” with a more personalized and professional-looking web address, like “www.yourblog.com“. Having a custom URL adds credibility to your blog and makes it easier for visitors to remember and share your website.
Why Should You Use a Custom URL?
Using a custom URL for your Blogger website offers several advantages:
- Enhanced Branding: A custom URL allows you to create a strong brand identity for your blog. You can align your web address with your blog’s name, making it more memorable and professional.
- Improved Credibility: A custom URL adds a level of professionalism to your blog, making it appear more trustworthy and authoritative to your audience.
- Better Search Engine Optimization (SEO): Having a custom URL can positively impact your blog’s SEO. Search engines often consider websites with custom domains as more relevant and trustworthy, leading to better search rankings.
- Easier Sharing: A shorter and more personalized web address is easier to share with others verbally or in writing. It makes it convenient for your readers to remember and recommend your blog to others.
How to Get a Custom URL for Your Blogger Website
Now that we understand the benefits of having a custom URL, let’s explore the steps to set it up for your Blogger website:
Step 1: Choose and Register a Domain
The first step is to choose a domain name that aligns with your blog’s theme and content. It should be catchy, relevant, and easy to remember. Once you have decided on a domain name, you need to register it with a domain registrar. There are numerous domain registrars available online, such as GoDaddy, Namecheap, and Google Domains. Compare their prices and features to select the one that suits your requirements.
Step 2: Configure DNS Settings
After registering your domain, you need to configure the Domain Name System (DNS) settings to connect it with your Blogger website. Here’s how you can do it:
- Log in to your domain registrar’s website and locate the DNS management section.
- Look for the option to edit the DNS records or manage custom DNS.
- Add a new CNAME record with the following details:
- Host: www
- Points to: ghs.google.com
- Save the changes and wait for the DNS settings to propagate, which may take a few hours.
Step 3: Set Up a Custom URL in Blogger
Once the DNS settings have propagated, it’s time to configure the custom URL in your Blogger account. Follow these steps:
- Go to your Blogger dashboard and select the blog you want to set up a custom URL.
- Navigate to the Settings > Basic section.
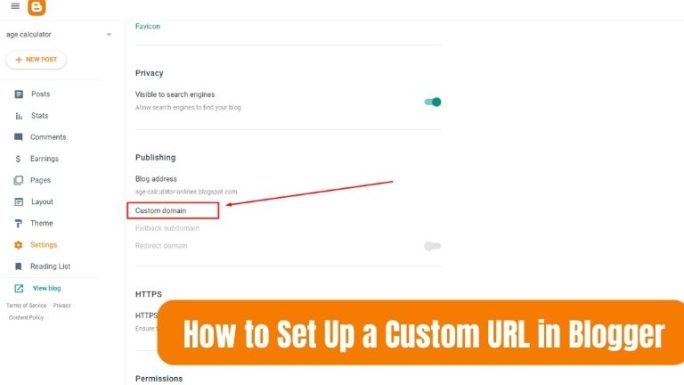
- Under the Publishing heading, click on the + Setup a 3rd party URL for your blog link.
- Enter your custom domain name (e.g., www.yourblog.com) in the provided field and click Save.
- You’ll receive an error message with two CNAME records. These records need to be added to your DNS settings.
- Return to your domain registrar’s website and locate the DNS management section again.
- Add the two CNAME records with the provided details.
- Save the changes and wait for the DNS settings to propagate.
Step 4: Verify Custom URL
After adding the CNAME records, you need to verify your custom URL in Blogger. Follow these instructions:
- Go back to the Settings > Basic section in your Blogger dashboard.
- Enter your custom domain name (e.g., www.yourblog.com) in the Publishing field again.
- Click Save. If the DNS settings have propagated correctly, you should see a confirmation message.
Congratulations! Now You have successfully set up a custom URL for your Blogger website. Now, visitors can access your blog using your personalized web address.
Conclusion
Having a custom URL for your Blogger website can greatly enhance your blog’s branding, credibility, and SEO. It provides a personalized touch to your online presence and makes it easier for readers to remember and share your blog. By following the steps outlined in this guide, you can set up a custom URL for your Blogger website and take your blogging journey to new heights.
FAQs About Custom URLs for Bloggers
Obtaining a custom URL for your Blogger website involves two costs: domain registration and the annual renewal fee. Domain registration prices vary depending on the domain registrar and the type of domain you choose. On average, you can expect to pay around $10 to $20 per year for a custom domain. Renewal fees are usually charged annually at the same rate as the initial registration fee.
Yes, you can use an existing domain for your Blogger website. During the domain setup process, instead of registering a new domain, you can select the option to use a domain you already own. Follow the instructions provided by your domain registrar to configure the DNS settings and connect your existing domain to your Blogger blog.
After setting up a custom URL for your Blogger website, your old Blogspot URL (e.g., yourblog.blogspot.com) will automatically redirect to your new custom domain (e.g., www.yourblog.com). This redirection ensures that visitors who have bookmarked your old URL or click on old links will be seamlessly redirected to your new web address.
Yes, if you decide to switch back to the default Blogspot URL in the future, you can do so. Simply go to the Settings > Basic section in your Blogger dashboard and remove the custom domain name you had set up. Your blog will revert to using the default Blogspot URL.
Switching to a custom URL should not negatively impact your blog’s SEO if you set up proper redirects and inform search engines about the change. It’s essential to follow best practices for URL redirection and update any internal links to reflect the new custom URL. Additionally, ensure that your blog’s content and SEO settings remain consistent after the switch.
Yes, you can use a custom email address with your custom URL. Many domain registrars and hosting providers offer email hosting services along with domain registration. This allows you to create professional email addresses using your custom domain, such as info@yourblog.com or contact@yourblog.com.







Recent Comments