


Creating convincing shadows is one of the most important skills in digital painting. In Krita, realistic shadows can transform flat shapes into believable forms with depth, atmosphere, and emotion. While Krita offers powerful tools, achieving natural-looking shadows depends more on understanding light behavior than on software tricks. By combining proper light logic with layer modes, brushes, and blending techniques, artists can render shadows that feel grounded and professional.
TLDR: Realistic shadows in Krita start with understanding your light source and mapping light and dark areas clearly before blending. Use Multiply layers, soft brushes, and careful color selection rather than black for natural results. Build shadows gradually, refine edges based on distance from the light, and add subtle reflected light for depth. Consistent light logic is the key to believable shading.
Step 1: Understand the Light Source
All Heading
Before opening Krita, the artist should define where the light is coming from. Shadows behave logically, and without a clear light direction, shading will look random.
Consider the following:
- Direction – Is the light above, below, left, or right?
- Height – Is it a high noon sun or a low sunset?
- Distance – Is it close like a lamp or far like the sun?
- Intensity – Is it soft and diffused or harsh and direct?
Shadows directly opposite the light source will be the darkest. Areas partially blocked from the light will show softer mid-tone shadows.
It helps to sketch a quick arrow pointing toward the light direction on a temporary layer. This visual reminder maintains consistency throughout the illustration.
Step 2: Block in Flat Colors First
Realistic shadows sit on top of solid color foundations. Each object should be filled with its base color on separate layers when possible. Keeping elements separated allows for easier shadow control later.
A recommended workflow in Krita:
- Create a base color layer.
- Lock the alpha channel.
- Add a new layer above it set to Multiply.
Using Multiply mode preserves the underlying texture and color while darkening naturally. This method produces more realistic results than simply painting with black.
Step 3: Choose the Right Shadow Color
One of the biggest mistakes beginners make is using pure black for shadows. Real shadows contain color influenced by ambient light and surrounding objects.
Instead of black:
- Shift toward cooler hues for outdoor daylight scenes.
- Shift toward warmer tones for indoor lighting.
- Use deep blues, purples, or cool browns for more natural depth.
In Krita’s Advanced Color Selector, slightly lower the value and adjust the hue instead of dragging directly to black. This maintains color richness and realism.
Step 4: Map the Core Shadows
Core shadows are the darkest parts of an object where light cannot reach directly. These usually appear along the turning edge of a form.
Using a medium-soft round brush:
- Mark the darkest shadow side first.
- Keep edges firm where forms sharply turn.
- Avoid blending immediately.
Blocking shapes clearly before smoothing helps maintain structure. At this stage, the drawing may look harsh—but strong foundations make blending easier later.
Step 5: Add Cast Shadows
Cast shadows occur when one object blocks light from hitting another surface. These shadows anchor objects in space.
To create realistic cast shadows in Krita:
- Create a new Multiply layer.
- Use a hard brush to define the shadow shape.
- Blur slightly using the Gaussian Blur filter or soft eraser.
The edge rule is important:
- Closer to the object → sharper and darker.
- Farther away → softer and lighter.
This subtle transition makes shadows believable.
Step 6: Blend Strategically
After blocking shadows, blending creates smooth transitions. Krita offers several blending approaches:
- Soft round brush with low opacity
- Smudge brush for organic transitions
- Gradient tool for large surfaces
However, over-blending flattens the image. Real life contains sharp and soft edges coexisting. Artists should deliberately choose where transitions stay crisp.
A helpful principle: Edges soften as they move away from the focal point.
Step 7: Add Reflected Light
Reflected light appears on the shadow side when light bounces off nearby surfaces. This subtle glow prevents shadows from looking lifeless.
To add reflected light in Krita:
- Create a new layer set to Overlay or Add.
- Select a lighter, slightly saturated hue.
- Apply gently on the lower edge of the shadow area.
Keep reflected light softer and weaker than the main light source. It should enhance form, not overpower it.
Step 8: Deepen Ambient Occlusion
Ambient occlusion refers to extremely dark shadow areas where light barely reaches, such as:
- Creases in clothing
- Between touching objects
- Under chins
- Between fingers
Add these selectively with a small brush at low opacity. These tiny dark accents dramatically improve realism and depth.
Step 9: Check Values in Grayscale
Color can distract from value accuracy. In Krita, artists can:
- Add a top layer filled with black.
- Set it to Color blending mode.
This temporarily converts the image to grayscale without permanently changing colors. If shadows are not clearly readable here, they need adjustment.
Step 10: Adjust with Layer Masks
Layer masks are essential for non-destructive editing. Instead of erasing shadows directly:
- Add a mask to the shadow layer.
- Paint with black to hide parts.
- Paint with white to reveal.
This method allows corrections without losing earlier work.
Common Shadow Mistakes to Avoid
- Using pure black
- Ignoring light direction consistency
- Making all edges equally soft
- Over-blending details
- Placing cast shadows incorrectly
Recognizing these errors is just as important as learning technique.
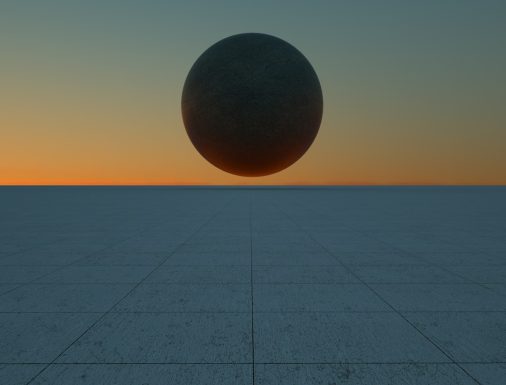
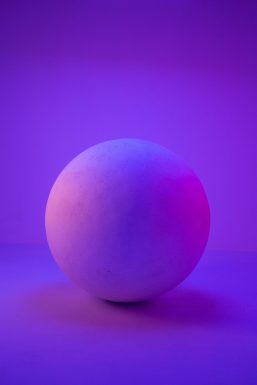
Practical Exercise for Improvement
Artists who want to master shadow realism can follow this simple practice routine:
- Paint a basic sphere.
- Add one consistent light source.
- Render core shadow, cast shadow, reflected light, and highlight.
- Repeat using different lighting setups.
This controlled study trains the eye to recognize value relationships before tackling complex scenes.
Why Realistic Shadows Matter
Shadows create depth, define shape, and build atmosphere. Without accurate shading, even well-drawn line art appears flat. In contrast, carefully rendered shadows can elevate simple drawings into immersive artwork.
Krita provides the technical flexibility, but understanding light physics and practicing deliberate mark placement are what truly refine skill.
FAQ: Drawing Realistic Shadows in Krita
- What is the best layer mode for shadows in Krita?
Multiply is the most commonly used mode for realistic shadows because it darkens colors naturally while preserving texture. - Should shadows always be cool colors?
Not always. Outdoor daylight often produces cooler shadows, while warm indoor lighting can create warmer shadow tones. The environment determines the color bias. - How do I make shadows softer in Krita?
Use a soft brush with low opacity, apply Gaussian Blur, or gently use the smudge tool. Remember that shadows get softer as they move away from the blocking object. - Why do my shadows look muddy?
This usually happens from using too much black or over-blending. Try using color variation and maintaining clear value separation. - Can I fix shadows without repainting everything?
Yes. Use layer masks and adjustment layers to refine values non-destructively. - How can beginners practice shadow realism effectively?
Start with simple geometric shapes under a single light source. Master light behavior on spheres, cubes, and cylinders before moving to complex subjects.
By combining thoughtful light planning, smart layer usage, controlled blending, and consistent value checking, artists can confidently create realistic shadows in Krita. Mastery comes not from one technique alone, but from disciplined practice and careful observation of how light shapes the world.


Recent Comments